Congratulations on your professionally upgraded iMac! This hub provides everything you need to know about keeping your machine updated and running perfectly for years to come.
Please Note: This guide is a living document and a work in progress. More information and tutorials may be added over time. If you have a specific question that isn't answered here, please feel free to reach out!
macOS Update Management Guide
Part 1: Preparation
An Important Note for OpenCore Users
The most important rule for a stable system is to **NEVER use Automatic Updates.** The standard macOS updater doesn't know about the special OCLP configuration. To prevent issues, we always use a simple, safe manual update process. Please ensure all toggles are OFF in System Settings > General > Software Update > Automatic updates.
Create a Time Machine Backup
As a professional best practice, I advise all Mac users to maintain a regular backup, regardless of their machine's make, model, or configuration. Before any system update, it is essential to create a full backup using Time Machine. This is your ultimate "undo button" and safety net, allowing you to restore your Mac to its exact previous state if anything goes wrong.
What You'll Need:
You will need an external hard drive. Any standard USB external drive from brands like Seagate, Western Digital, or LaCie will work perfectly. For best results, choose a drive that has **at least the same amount of storage as your iMac's internal drive, or larger.** For example, if your iMac has a 1TB SSD, use a 1TB or 2TB external drive.
How to Set It Up:
- Connect the Drive: Plug your new external hard drive into one of your iMac's USB ports.
- Format the Drive (if needed): A pop-up may appear asking if you want to use the drive for Time Machine. If so, click "Use as Backup Disk." If not, open the "Disk Utility" application, select your external drive, click "Erase," and format it as "APFS" or "Mac OS Extended (Journaled)."
- Start the First Backup: Once formatted, go to System Settings > General > Time Machine. Click "Add Backup Disk," select your external drive, and the backup will begin. The first backup can take a few hours, so let it run.
- Before an Update: Always ensure your backup is current. Click the Time Machine icon in the menu bar (a clock with a circular arrow) and select "Back Up Now."
Part 2: The Smart Update Process
The OpenCore Legacy Patcher (OCLP) is an intelligent application that often guides you through the update process. The key is to follow its prompts. Here is the typical workflow:
Check for OCLP Prompts & Prepare
Before you do anything, open the OpenCore-Patcher app from your Applications folder. OCLP will automatically check for updates and prompt you if its own application or bootloader is out of date. Always accept these updates first.
Pro-Tip: Sometimes, when you check for a macOS update in System Settings, OCLP will detect this and proactively prompt you to download necessary libraries in advance. If you see this prompt, accept it. This makes the final patching step much faster.
Install the macOS Update
Once OCLP is up-to-date, you can proceed. Go to System Settings > General > Software Update and click "Update Now." Your iMac will download the official update directly from Apple's servers and begin the installation, which may involve several restarts. This is normal.
Apply Post-Install Root Patches
This is the final and most important step. Each official update from Apple **wipes the custom drivers** needed for things like graphics and Wi-Fi to work on your iMac. This step reinstalls them.
After the macOS update is complete, the OCLP app should automatically open and prompt you that "post-install root patches are required." Simply follow the on-screen instructions to apply them. If it doesn't open automatically, just launch it yourself and click "Post-Install Root Patch." Reboot when prompted to complete the process.
⚠️ Important Note on macOS Tahoe Upgrades
At the moment, macOS Tahoe (26) is not yet stable for OCLP systems. The update will appear in your System Settings as shown below, but you must NOT install it yet.
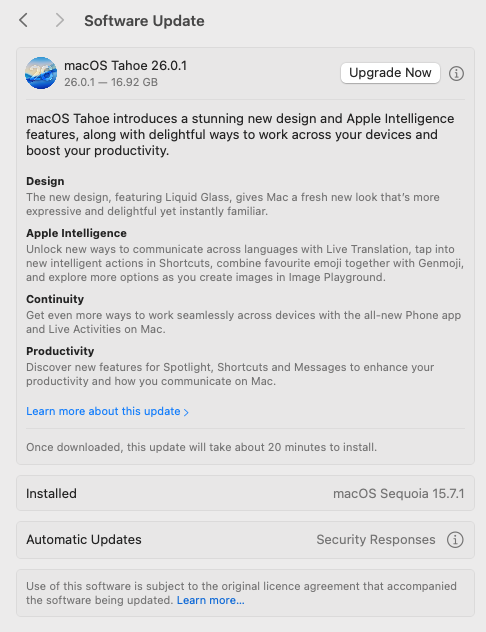 Example of the macOS Tahoe update prompt in System Settings.
Attempting to upgrade now will lead to an unstable and unusable system. Please wait for the go-ahead on this guide before proceeding. All customers will be informed once it is safe to upgrade, which should be in January 2026, once the stable release has been fully tested.
Part 3: Frequently Asked Questions (FAQ)
A Clear Guide to OpenCore Legacy Patcher (OCLP)
At the heart of every modern, upgraded iMac I build is a brilliant piece of software called OpenCore Legacy Patcher, or OCLP. If you've ever wondered how it's possible to run the latest, most secure macOS on a machine that Apple no longer officially supports, this guide will explain the magic in a simple, technical way.
1. The Problem: The "Software Wall"
Every year, Apple releases a new version of macOS with new features and security updates. For business reasons, they also publish a list of Mac models that can officially run it. Typically, after about 6-8 years, older Macs are left behind and no longer receive these major upgrades, even though their hardware is often still incredibly capable.
This creates a "software wall" where perfectly good, high-quality machines are prevented from running modern software. This is the problem that OCLP was created to solve.
2. The Solution: OCLP as the "Master Translator"
It's important to understand that OCLP is not a "hack" or a pirated piece of software.
Think of OCLP as a highly sophisticated translator. The new macOS speaks a new "language" that the older hardware doesn't fully understand. OCLP is a modern, open-source, and publicly audited tool that sits between them and translates in real-time, allowing them to communicate perfectly.
It is a bootloader, which means it's a small piece of software that runs for a few seconds right when you turn your Mac on, before macOS itself even starts.
3. How It Works: The Startup Process
The genius of OCLP is that its process is both powerful and non-invasive. It doesn't permanently change or damage your macOS installation. Here's a step-by-step look at what happens when you press the power button:
Startup: When you turn on your iMac, the first thing it does is look for instructions on a tiny, hidden section of your main drive called the EFI partition.
OCLP Loads First: I install the OCLP bootloader onto this partition. So, before macOS starts, OCLP loads into the computer's memory (RAM).
Applying "In-Memory" Patches: For a few moments, OCLP creates a virtual environment in the memory. It applies a set of patches and instructions that essentially trick the official macOS installer into thinking it's running on a newer, supported machine.
Booting Genuine macOS: With the translation layer active, the system then proceeds to load the 100% genuine, unmodified, and cryptographically signed version of macOS that was downloaded directly from Apple's servers.
The Post-Install Root Patch (The Final, Crucial Step): This is the magic that makes everything work smoothly after you've logged in. Each official update from Apple wipes the custom drivers needed for things like graphics, Wi-Fi, and Bluetooth to work on your specific iMac. The OCLP application's final step is to run a "Post-Install Root Patch," which simply reinstalls these necessary drivers. This is why your graphics look beautiful and your Wi-Fi connects perfectly.
4. The Result: What This Means For You
A Modern Experience: You get to use the latest features, run the newest applications, and receive critical security updates on a budget-friendly machine.
Excellent Performance: Because the core macOS is genuine and the OCLP process has a negligible impact on performance, the speed you experience is a direct result of the high-quality hardware upgrades, like the mandatory SSD.
Safety and Stability: The process is transparent, community-vetted, and doesn't permanently alter the core operating system, making it a reliable and stable solution for extending the life of your iMac.
Yes, absolutely! However, it's crucial not to upgrade on release day. The OCLP community needs time (usually 2-3 months) to ensure the new OS runs perfectly on older hardware. I personally test these major upgrades and will give my clients the go-ahead once I've confirmed it's stable and reliable.
Your Time Machine backup is your ultimate safety net. You can boot into macOS Recovery (by holding Command+R at startup) and restore your Mac to its exact previous state. For minor issues like Wi-Fi not working, simply re-running Step 3 (Apply Post-Install Root Patches) fixes the problem 99% of the time.
Dual Boot Management Guide
If your iMac is configured to run both macOS and Windows, giving you the best of both worlds. This guide explains how to switch between them and handle updates.
How to Switch Between macOS and Windows
Thanks to the OpenCore bootloader, you don't need to hold any keys. The boot selection menu will appear automatically every time you start your iMac.
- Restart or Turn On Your iMac: Simply start your machine as you normally would.
- Wait for the Boot Picker: After a moment, you will see the OpenCore boot picker screen, showing icons for macOS and Windows.
- Stop the Timer (You have 5 seconds!): The system will automatically boot into the default OS after a 5-second countdown. To stop this timer and make a choice, simply **press any arrow key** on your keyboard. You can now take your time.
- Select and Boot: Once the timer is stopped, use the left and right arrow keys to highlight the operating system you want to use. When you've made your choice, press the **`Enter`** key or click the icon with your mouse to start up.
Updating Windows and macOS
Updating Windows: You can update Windows normally. Simply go to Start > Settings > Update & Security > Windows Update and install any available updates as you would on a standard PC.
⚠️ Important Note for Windows 11 Users
To ensure system stability, it is crucial to manage a specific setting within the Microsoft PowerToys application. Please make sure the "Awake" utility is enabled. This prevents the iMac's screen from freezing after the system enters a hibernation state due to inactivity. This setting is pre-configured on my builds, but it's important to be aware of it and ensure it remains active.
Download PowerToys: If you need to download and install Microsoft PowerToys, you can get it from the Microsoft Store: Microsoft PowerToys
Configuring PowerToys Awake Settings:
- Open PowerToys: Search for "PowerToys" in the Windows Start
menu and open the application.
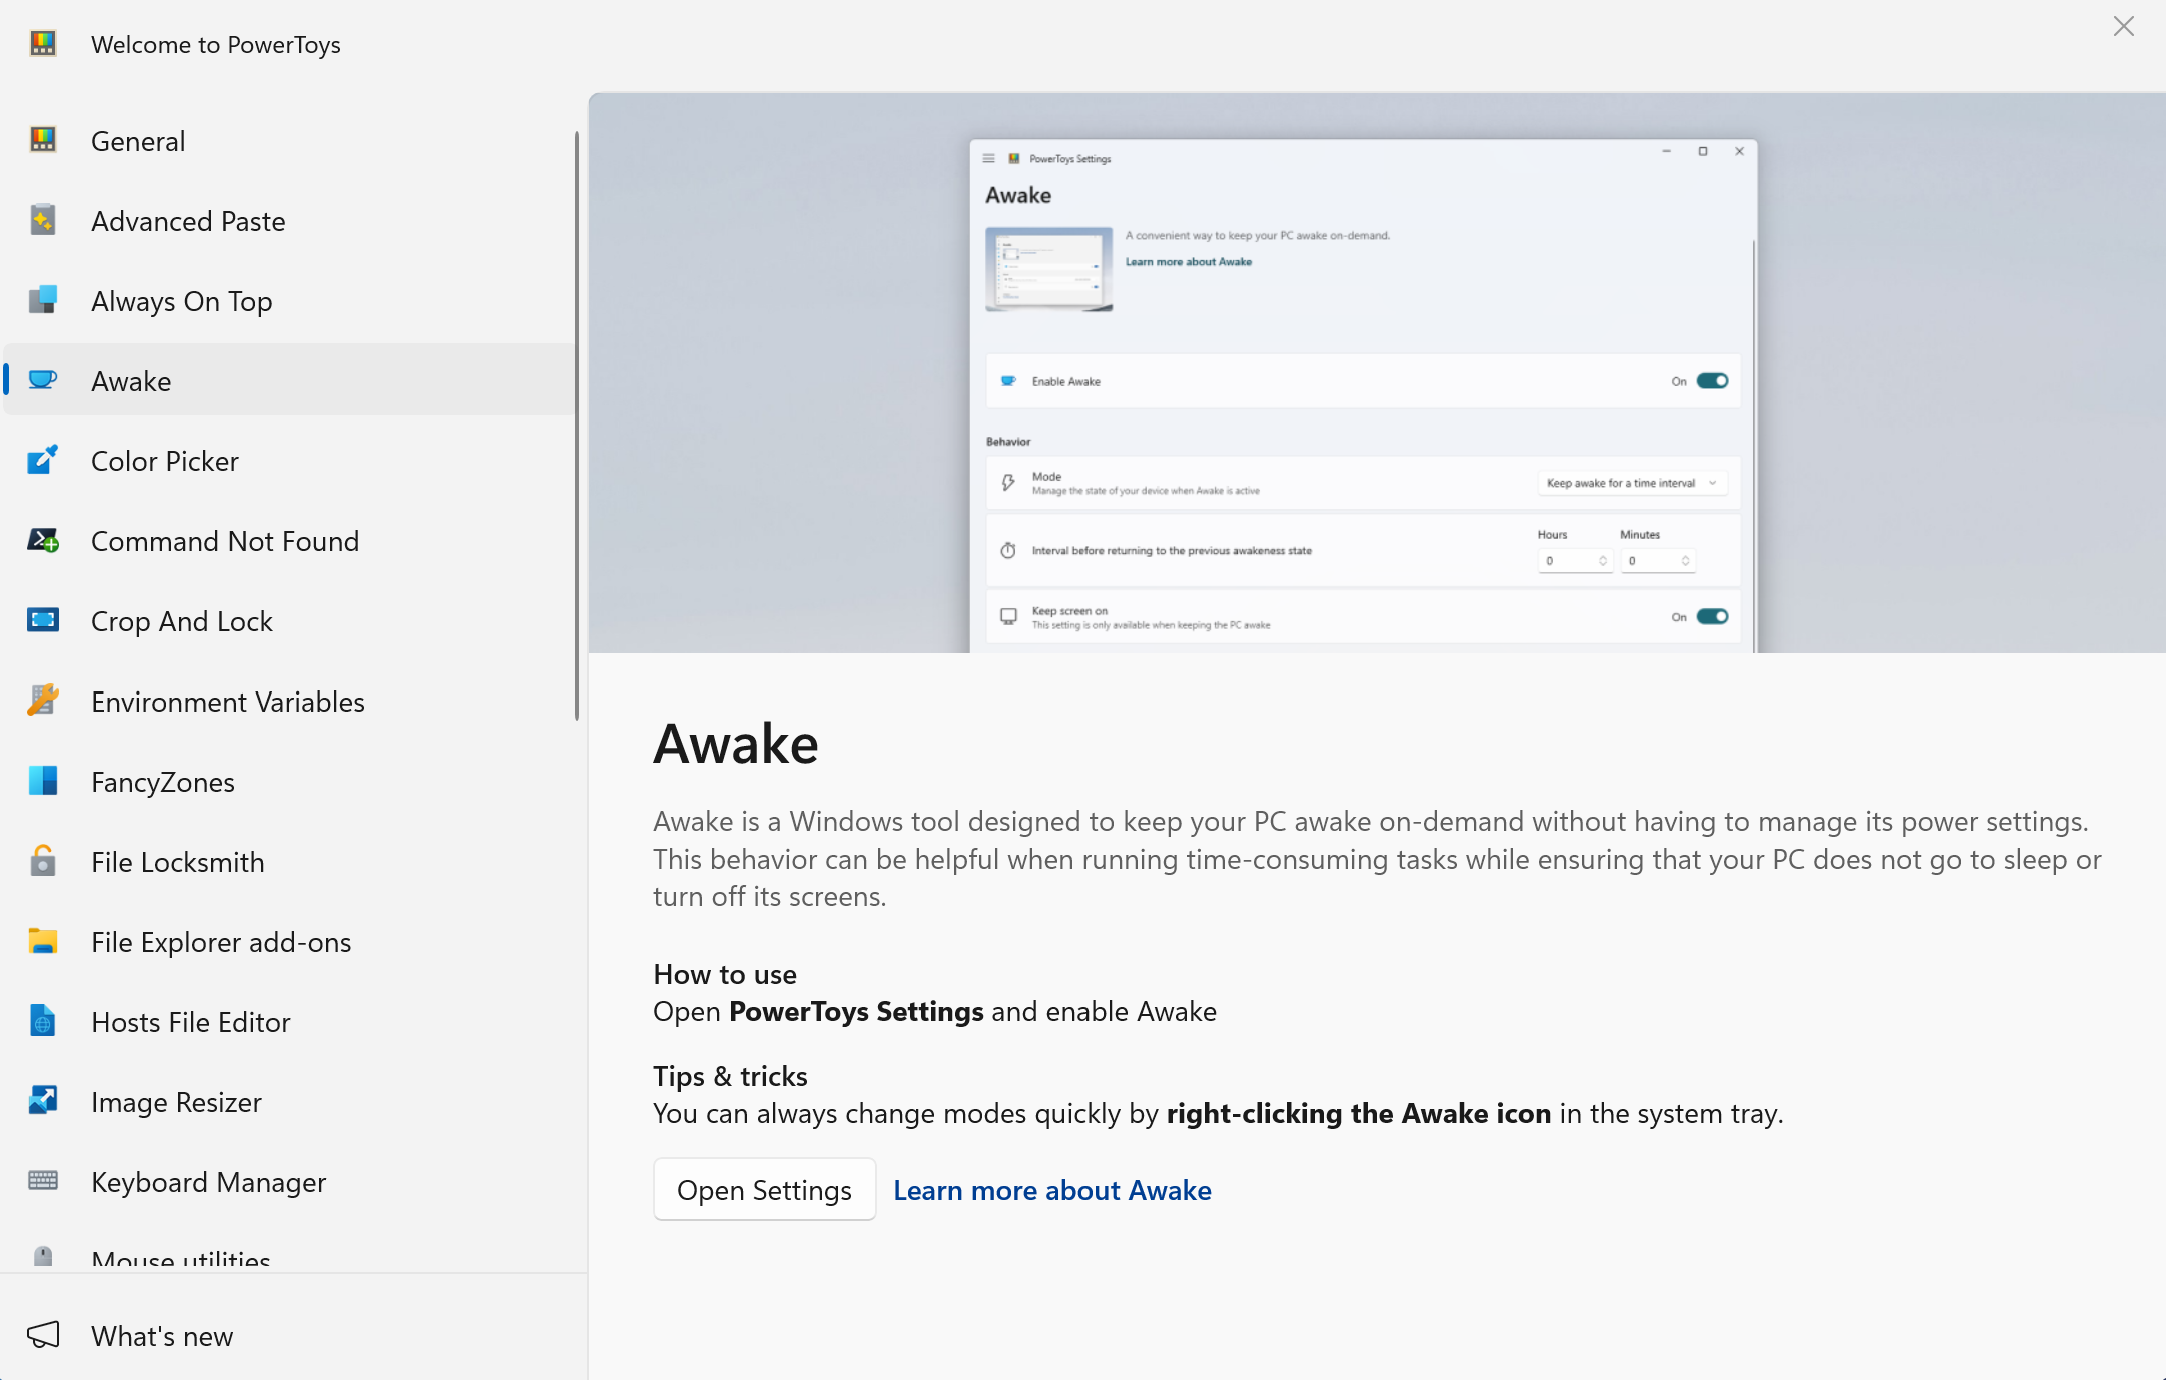 PowerToys main interface
showing the Awake option in the sidebar
PowerToys main interface
showing the Awake option in the sidebar
- Navigate to Awake Settings: Click on "Awake" in the left
sidebar to access the power settings.
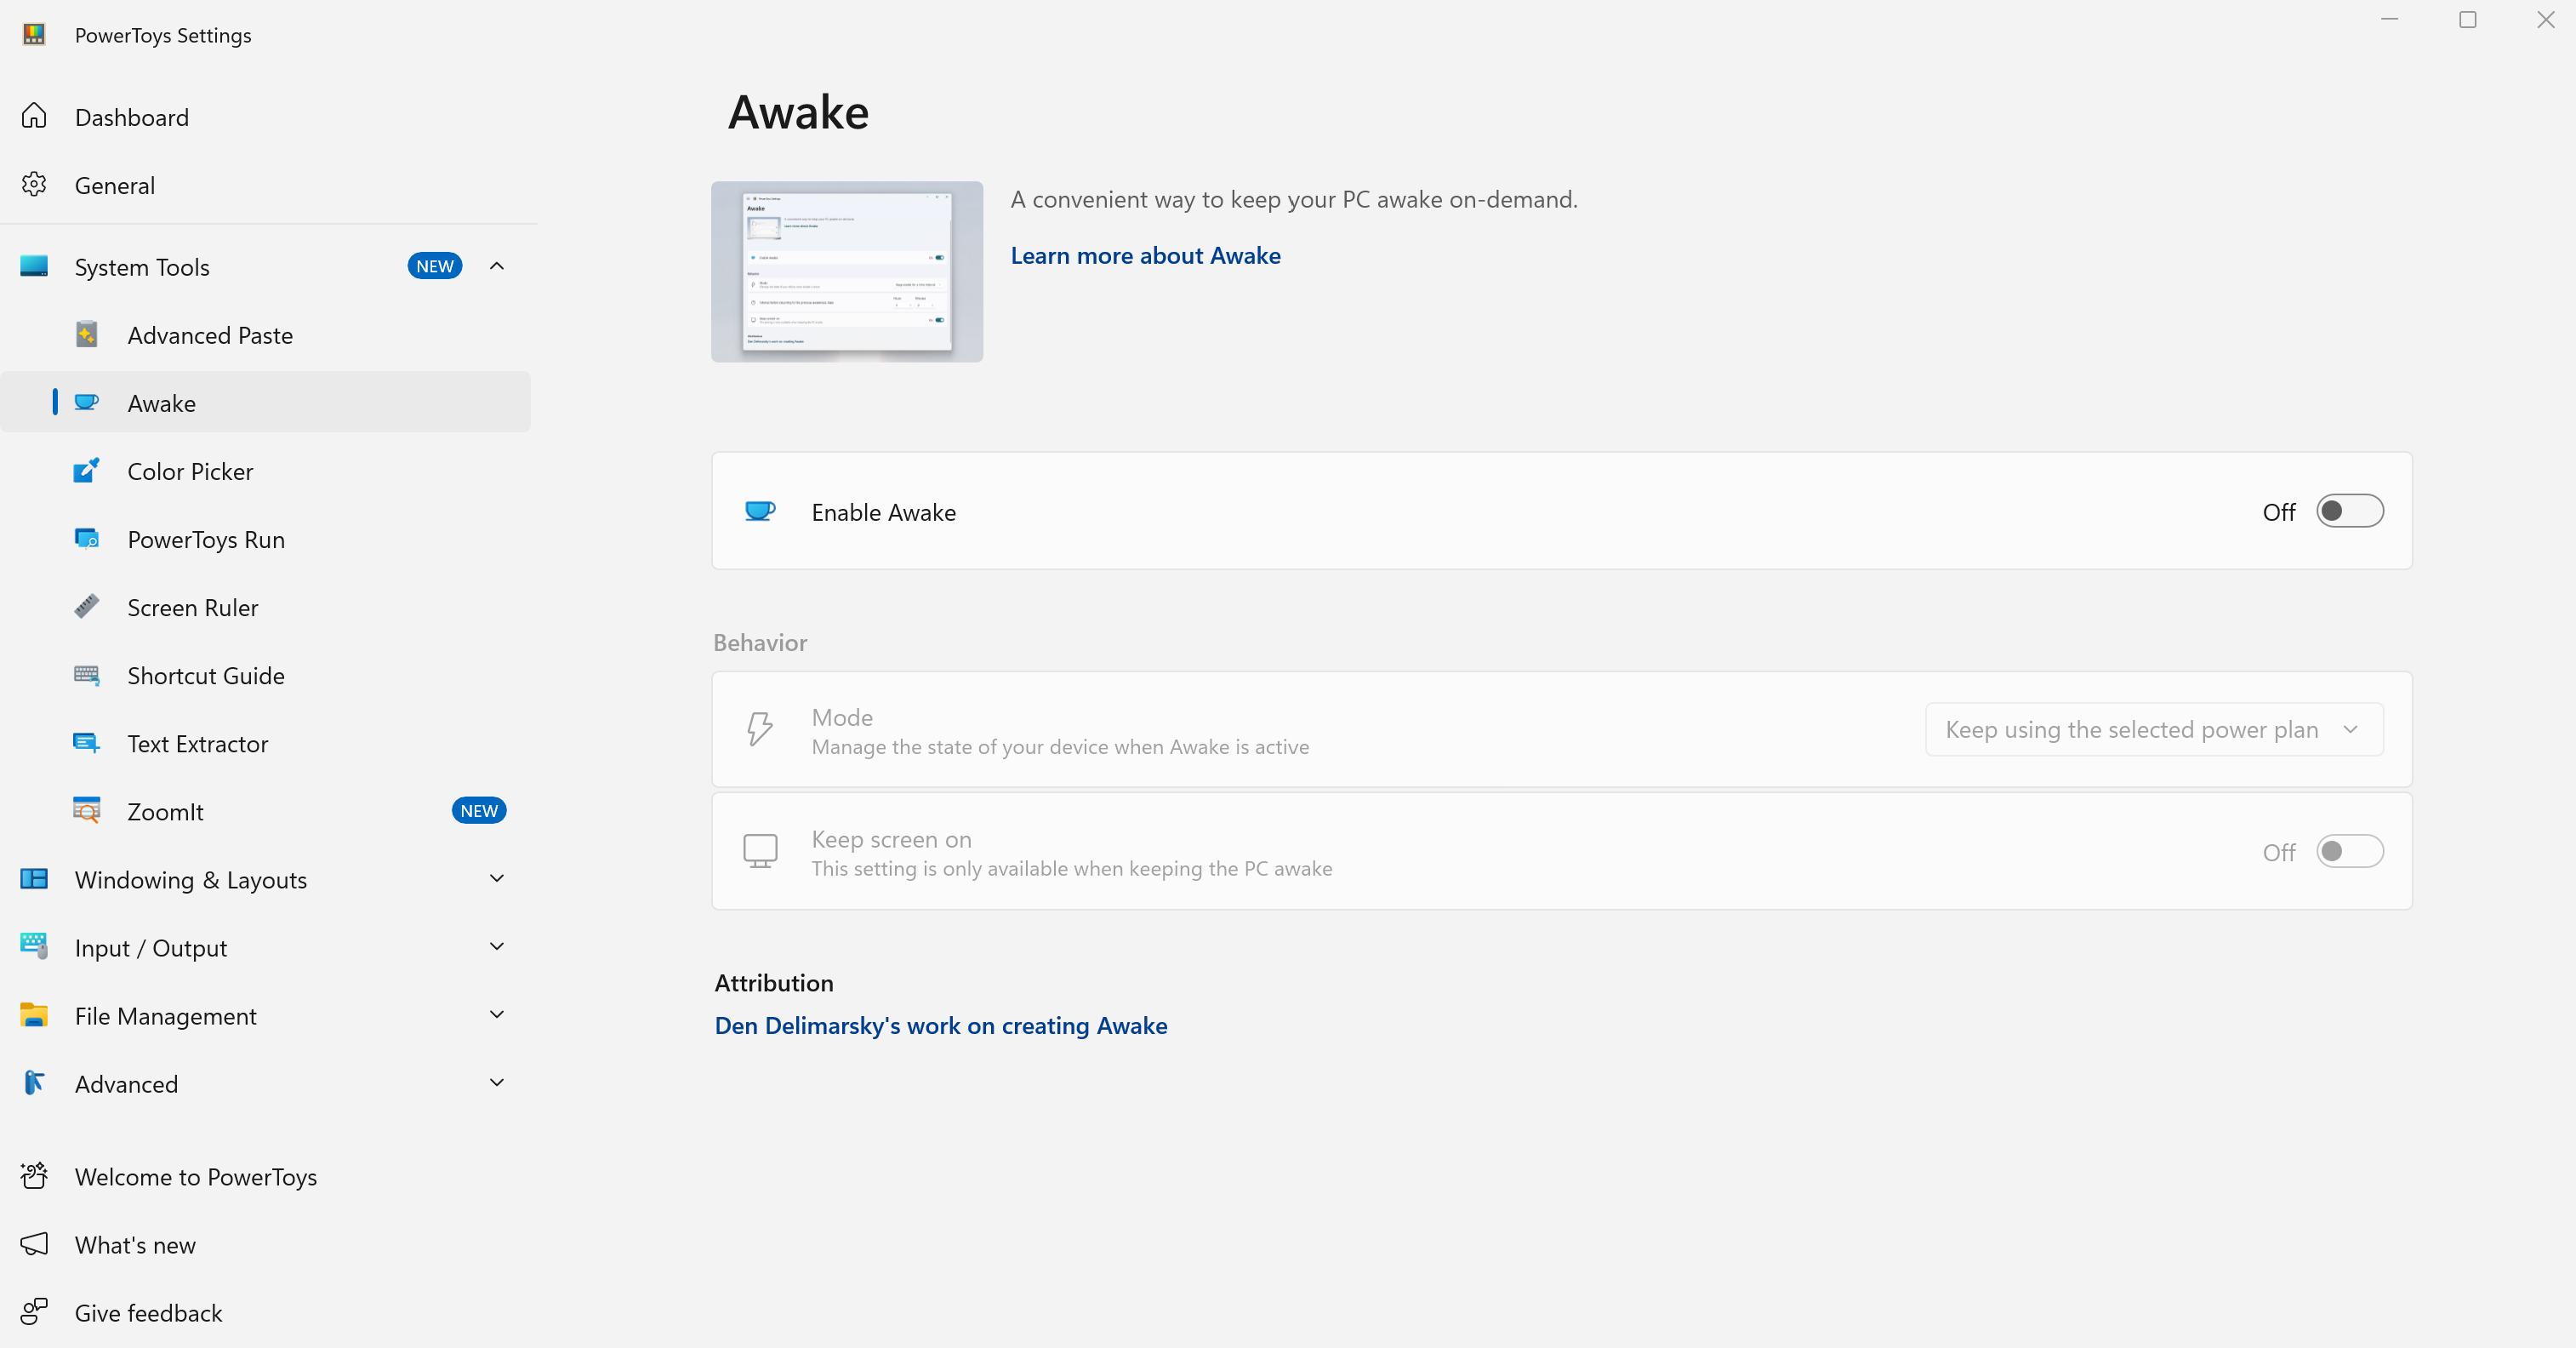 Default Awake settings
view
Default Awake settings
view
- Enable and Configure Awake: Toggle the "Enable Awake"
switch to ON, then select "Keep awake indefinitely" from
the dropdown options. Additionally, make sure to enable the "Keep
screen on" toggle to prevent screen hibernation.
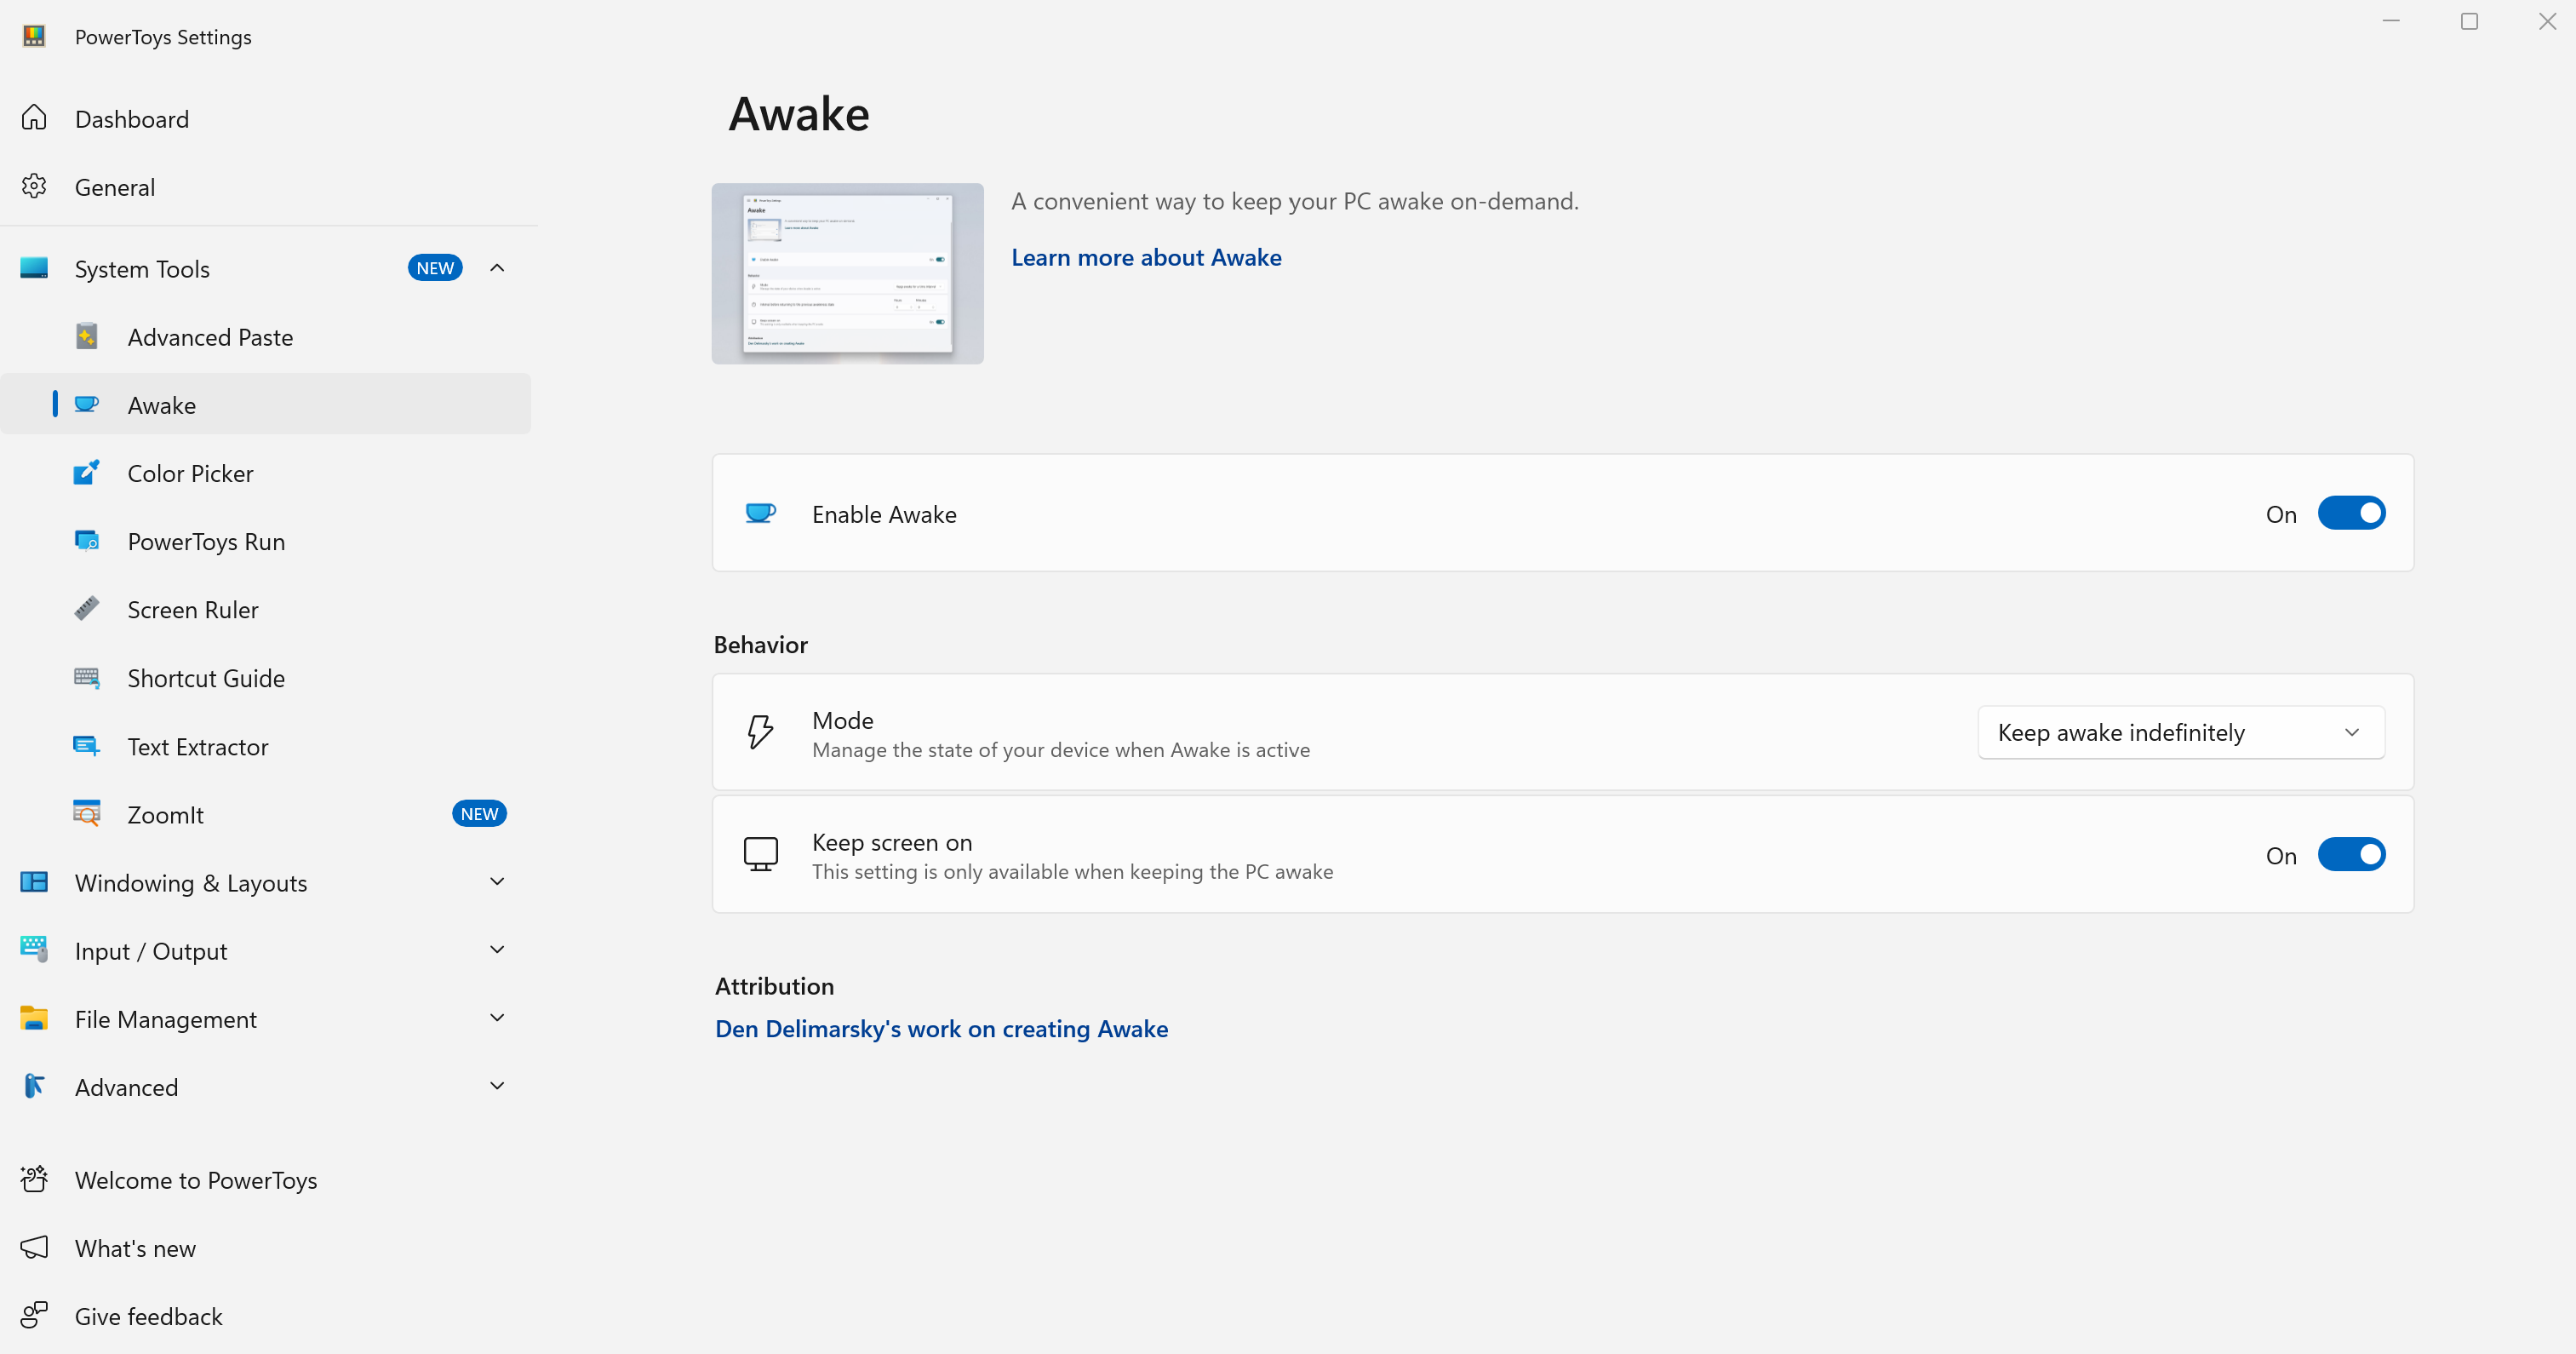 Correct configuration with
"Keep awake indefinitely" and "Keep screen on" both
enabled
Correct configuration with
"Keep awake indefinitely" and "Keep screen on" both
enabled
Alternative Method: You can also manage Awake by right-clicking the PowerToys Awake icon in the system task tray and selecting the appropriate mode.
Important: Both "Keep awake indefinitely" and "Keep screen on" options must be enabled to prevent the iMac's screen from freezing during hibernation.
Updating macOS: This is very important. To update the macOS side of your dual-boot system, you must follow the **exact same procedure** detailed in the "macOS Update and Upgrade Procedure" section above. This ensures the OpenCore Legacy Patcher configuration remains correct.
User Account Management Guide
Managing user accounts on your dual-boot iMac involves understanding both macOS and Windows 11 user management. This guide covers account setup, security, and best practices for both operating systems.
Creating and Managing User Accounts
Your iMac supports all standard user account types and management features for both macOS and Windows 11. Here's how to properly set up and manage user accounts on both systems:
macOS - Adding New User Accounts:
- Open System Settings: Click the Apple menu > System Settings (or System Preferences on older macOS versions).
- Navigate to Users & Groups: Look for "Users & Groups" in the sidebar or main settings area.
- Authenticate: Click the lock icon and enter your administrator password to make changes.
- Add User: Click the "+" button to add a new user account.
- Choose Account Type: Select from Administrator, Standard, or Managed with Parental Controls.
- Complete Setup: Fill in the required information (name, account name, password, and password hint* optional).
Windows 11 - Adding New User Accounts:
- Open Settings: Press Windows key + I, or click Start > Settings.
- Navigate to Accounts: Click on "Accounts" in the left sidebar.
- Access Family & Users: Click "Family & other users" in the account settings.
- Add Account: Click "Add someone else to this PC" under "Other users".
- Choose Account Type: Select "I don't have this person's sign-in information" then "Add a user without a Microsoft account" for local accounts.
- Complete Setup: Enter username, password, and security questions for the new account.
- Set Account Type: After creation, click the account and choose "Change account type" to set as Administrator or Standard User.
💡 Dual-Boot Consideration
macOS: All new user accounts will automatically benefit from all OCLP enhancements including graphics acceleration, Wi-Fi functionality, and any other post-install patches, as the OCLP configuration is installed globally on your system.
Windows 11: New user accounts will have access to all pre-configured Windows applications including PowerToys but the Awake functionality needs to be configured for each User account individually.
Account Security & Best Practices Advice
Securing user accounts on both macOS and Windows 11 is essential for protecting your data and maintaining system integrity. Here are platform-specific security recommendations for your macOS and/or Windows 11 iMac:
macOS Security Settings:
- Strong Passwords: Use unique, complex passwords for each account. Consider using the built-in password manager.
- Two-Factor Authentication: Enable 2FA for Apple ID accounts used on the system.
- Automatic Login: Disable automatic login for security, especially on shared machines.
- Screen Lock: Set up screen saver password requirements after a reasonable timeout period.
- Guest Account: Disable the guest account if not needed for security.
Windows 11 Security Settings:
- Microsoft Defender: Ensure Windows Defender is active and updated.
- User Account Control (UAC): Keep UAC enabled to prevent unauthorized changes.
- Microsoft Account vs Local: Choose based on your privacy preferences and sync needs.
- Windows Updates: Enable automatic security updates for critical patches.
- Family Safety: Use Microsoft Family features for child accounts and screen time management.
Disk Encryption for Both Systems:
macOS - FileVault:
- Enable FileVault: Go to System Settings > Privacy & Security > FileVault.
- Choose Recovery Method: Select either iCloud account recovery or create a recovery key.
- Important: Store your recovery key securely - you'll need it if you forget your password.
- Restart Required: FileVault encryption begins after restart and continues in the background.
Windows 11 - BitLocker:
- Enable BitLocker: Go to Settings > System > Storage > Advanced storage settings > Disk & volumes.
- Select Drive: Click your Windows drive and select "Turn on BitLocker".
- Backup Recovery Key: Save your recovery key to a secure location (not on the encrypted drive).
- Encryption Process: BitLocker will encrypt in the background while you continue using Windows.
⚠️ Administrator Accounts:
Always maintain access to at least one Administrator account with a known password on both operating systems.Account Switching & Fast User Switching:
macOS:
- Go to System Settings > Users & Groups
- Click "Login Options" in the sidebar
- Enable "Show fast user switching menu as" and choose your preferred display option
Windows 11:
- Click the Start button and select your user account icon
- Select "Switch user" from the dropdown menu
- Or use Ctrl + Alt + Delete and select "Switch user"
Time Machine Restore Guide
Restoring from Time Machine backups on OCLP systems requires a special procedure to ensure complete restoration without issues. This guide covers the recommended method for full system restoration.
⚠️ Critical Information Before Restoring
- Root Patches Impact: OCLP root patches can interfere with Time Machine restoration and may cause kernel panics.
- Sequoia Warning: Time Machine on macOS Sequoia may not function properly even after uninstalling root patches, potentially causing restore loops.
- System Requirements: Full restoration is only supported on Monterey and newer. Big Sur does not support snapshot reversion.
- Network Drives: If your backup is on a network drive, ensure Ethernet connectivity as WiFi may be unavailable during restoration.
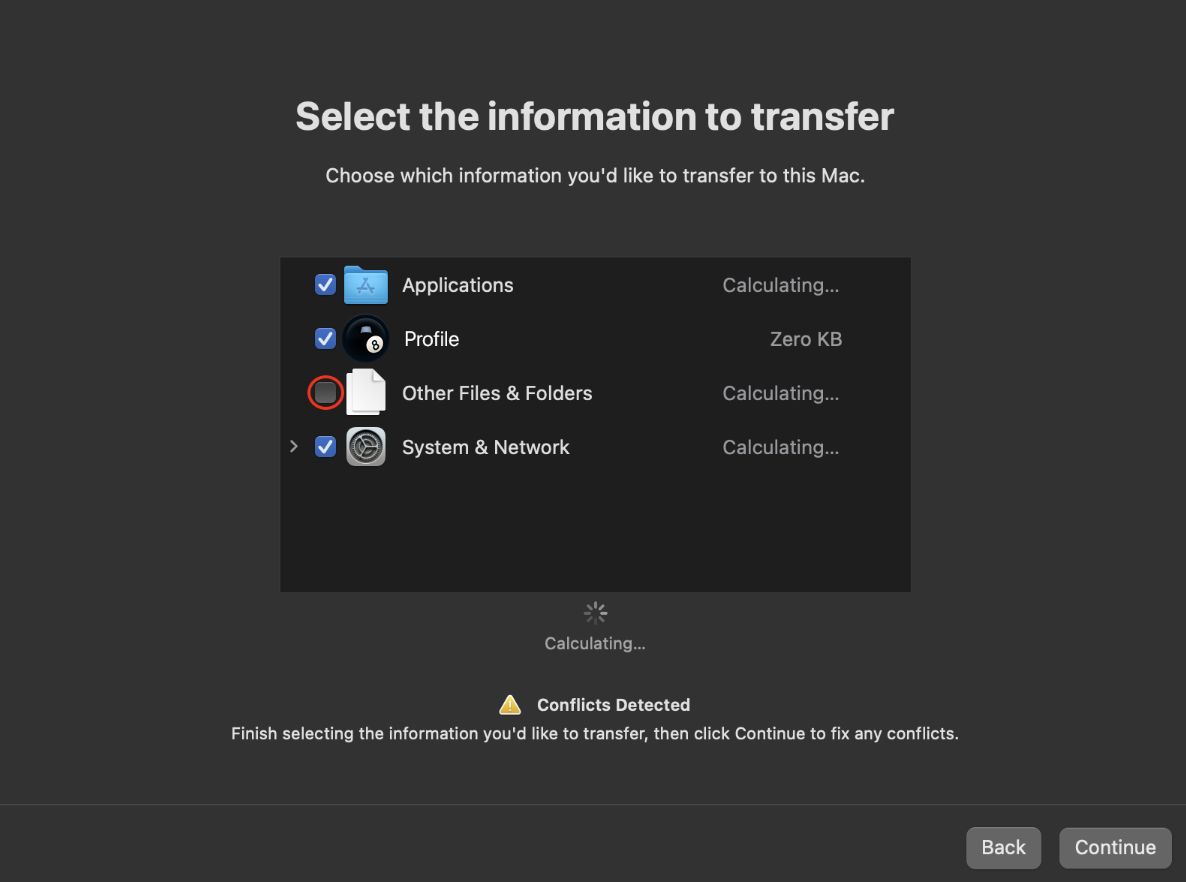 Migration Assistant showing transfer options
during the restoration process
Migration Assistant showing transfer options
during the restoration process
Complete Time Machine Restoration
This method provides complete system restoration, restoring everything exactly as it was, including all files and system configurations.
📋 Requirements
Requires macOS Monterey or newer. Your Mac will temporarily run slower with reduced functionality during the process.
Steps:
- Initial Setup: During first-time Setup Assistant, do NOT restore the backup. Complete all settings as if starting fresh and reach the desktop.
- Remove Root Patches from System: Open the OCLP application and navigate to "Post Install Volume Patches" section. Click to revert/uninstall the root patches. This completely removes all OCLP modifications from the system.
- Mandatory Restart: Restart your iMac to ensure the root
patch removal takes full effect.
Expected Behavior: Your Mac will feel slow due to lack of graphics drivers, resolution may be incorrect, and WiFi will likely be unavailable. This is normal and expected.
- Use Migration Assistant Only After Restart: Once logged back in after the restart, launch Migration Assistant and proceed with the complete restoration process. Do not attempt to use Migration Assistant before completing the restart.
- Reinstall Root Patches: After restoration is complete, reopen the OCLP application and reinstall the root patches to restore full functionality.
- Final Restart: Restart once more to complete the process with full OCLP functionality restored.
This method provides complete restoration but requires temporary removal and reinstallation of root patches.
Common Issues and Solutions
- Sequoia Restore Loops: If you encounter "Migration Finished" loops on Sequoia, restore on an older macOS version first, then upgrade to Sequoia afterward.
- Network Drive Access: If your backup is on a network drive and WiFi is unavailable during the process, connect via Ethernet cable.
- Kernel Panics: If you experience crashes during restoration, ensure you're using the correct method for your macOS version and that root patches are properly handled.
- Restoration Issues: If the restoration process fails, ensure root patches are completely reverted before attempting again.
About Me
As an Apple ACiT & ACMT Certified Technician, I'm passionate about custom-building iMacs and it's a professional hobby. I think iMacs are superb, elegant devices that, when properly maintained and upgraded, can unlock incredible performance with the latest operating systems.
That’s why I perform a full internal service on every machine: a deep clean of the cooling system, new thermal paste, and crucial upgrades to new high-speed SSDs and RAM.
Whether you have bought a custom build or just have a question about Macs in general, feel free to reach out—I'm always happy to consult.